The initiation is an essential part of any Reiki course, and is the only part that you really can’t teach to yourself. Every initiation I have given has felt unique, and every one has left me feeling humbled. I consider the task of giving initiations to be an honour and a great blessing.
Your Role in the Initiation
When you explain the initiation to a student, you will probably tell them to relax. However even if they totally fail to relax, and even if their mind finds no sense of stillness at all, the initiation will still be effective.
The same applies to you. You don’t need to worry about whether you will somehow fail to do the initiation properly. You don’t need to worry about drawing the symbols wrong, or doing something out of sequence, or trying to build a special level of energy. Just as the student need not worry, so you need not worry. If you accidentally do something slightly different from the sequence, the process will still be effective.
Symbology
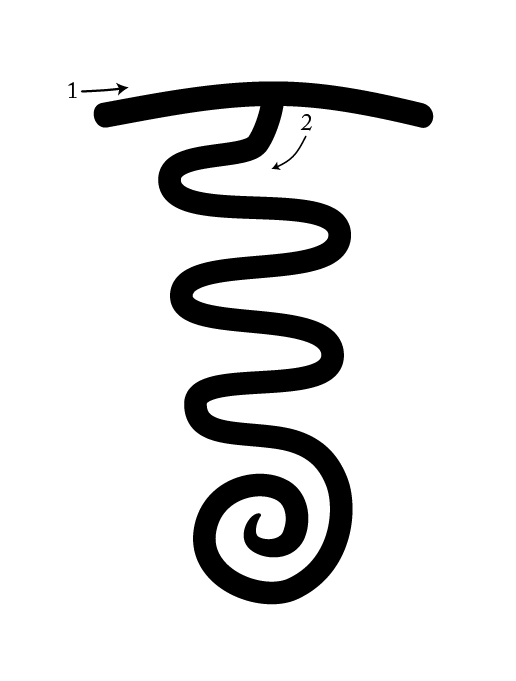
For the initiation sequence that you will use, there are two additional symbols. These are derived from Tibetan styles of Reiki. The first is the Tibetan Fire Serpent, which is used at the start of the initiation to help prepare the student, stimulating, opening, and clearing the energy system. It is drawn down the spine, ending in a coil at the base of the spine, which is the centre of Kundalini energy1The Fire Serpent Symbol, http://ilovereiki.net/reiki-symbols/fire-serpent-symbol.

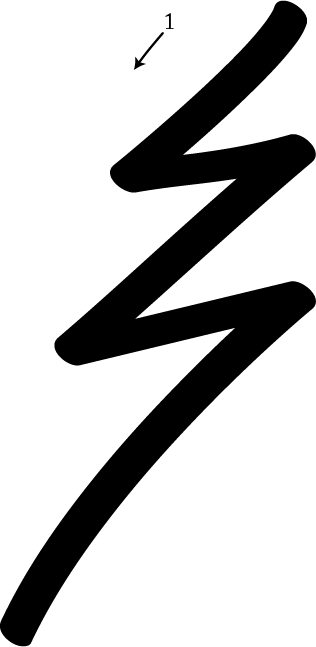
The second additional symbol is Raku2Raku, reikirays.com/21511/raku/. It is used once only, but has two main purposes, the first of which is grounding. Towards the end of the initiation, you will plant the universal symbol into each of the feet. This strengthens the connection with earth and encourages the energy to flow downwards. The Raku symbol, symbolising a lightning bolt from the sky, is drawn soon after this, and helps the student to ground fully.

The second purpose of Raku is to create a separation of the energies between master and student, bringing the initiation to a close. Although I never recommend making barriers between yourself and other people, in this case the Raku is not drawn out of a sense of fear. Rather, the merging of your energies and the energies of the student during an initiation can be intense, and Raku, like the lightning bolt that splits the air, allows you both to fully let go of your initiation energetic bond. This enables the student to begin processing the energies of the initiation for herself.
The Lineage
When you teach Reiki, unless you have changed the teachings significantly then you will describe your lineage as Usui Shiki Ryōhō, and you can trace your Reiki heritage back to Mikao Usui through the chart that follows.
For a discussion of what lineage really means, and how Reiki practitioners and teachers often misunderstand it, see the page The Reiki Lineage Reconsidered.
Lineage
With this chart you can trace your lineage, through the initiations given from teacher to student, all the way back to the founder of Reiki, Mikao Usui.
Twenty-one of Usui’s students reached shinpiden, the highest level of teachings. One of these, Chûjirô Hayashi, taught the Japanese-American Hawayo Takata, who was responsible for introducing Reiki to the West. She taught twenty-two master-level students, who helped spread Reiki across the world.
Hawayo Takata transmitted the lineage of Usui Shiki Ryōhō to Beth Gray and Phyllis Lei Furumoto. Through a series of Reiki masters, this lineage is now being extended to you.

The Lineage of Usui Shiki Ryōhō
Elements of the Initiation
This section explains the significance of various parts of the initiation3The explanations are based on Reiki and the Healing Buddha by Maureen J. Kelly.. The actual procedure of initiation is given in a following lesson.
Why East?
Buddhists believe that the Buddha faced east when he sat under the Bodhi tree and achieved enlightenment. It is taught that Dr Usui faced east during his enlightenment experience on Mount Kuriyama. Therefore during the initiation, the master and the student face east, towards the new sunrise.
While facing east is not essential, it might help you to know that you have done things according to tradition.
Invocation
It is important to recognise that we do not do the initiation on our own. This helps release us from feeling a terrible responsibility to get everything right! Invoke the blessing and guidance of whoever you pray to. This might include the masters Usui, Hayashi, and Takata; your spirit guides; God or the Holy Spirit.
Blessing the Self
The final stage of preparation for the initiation is placing the master symbol and universal symbol into your hands. Blessing yourself with the master symbol signifies that you hold the keys to the system of Reiki, and are fully entitled to pass this gift onto another. The universal symbol represents your connection to every element of creation.
How many initiations?
Reiki One has either four initiations or two, depending on how much time you have available. The other levels have one initiation only.
Stepping into the Healing Mandala
You create the healing mandala by drawing the master symbol and universal symbol into the ten directions. Starting with east, draw the symbol into each corner and side of the room, in this sequence: E, NE, N, NW, W, SW, S, SE. Follow this with the ceiling, and finally floor. You can finish by drawing the symbols into the centre of the room if you like.
This purifies the space and creates ideal conditions for the energy work you are doing.
The Initiation Symbol Sequence
At several times during the initiation you will need this sequence:
- HSZSN
- SHK
- DKM
- CKR
As you use these symbols, say the mantras three times silently. It is worth memorising this sequence.
Performing a Distance Initiation
Performing a distance initiation is very similar to an in-person initiation. First you will need to arrange a time so that you can do it live, in real-time4It is possible to send initiations across space and time, but it will probably help you connect if you know it is happening in real-time.. Second, consider whether you want to visualise and perform the whole ritual around a chair that appears to be empty, or whether you want to use a proxy. If you use a proxy, she should focus on the recipient of the initiation. If possible, ask another Reiki teacher to be the proxy, as she will be able to let go of desire for personal gain from the initiation, and instead focus solely on the intended recipient.
Obtain a photograph of the recipient if you don’t know them well5If you already know the person, then you will be able to visualise them without the need for a photograph., so that you can better focus on them. You might wish to place it next to a candle.
When you are ready to begin, the very first step of the distance initiation is to connect to the student. You can use this sequence:
- Close your eyes and put your hands in gasshô. Then say the name of the person three times, as you focus on an image of the person in your mind.
- Visualise the HSZSN, SHK, and then CKR, with mantras.
- Proceed with the initiation as normal.
When you have finished the initiation, you may wish to disconnect from the other person by drawing a CKR in reverse, from the centre outwards.
Preparation
You should prepare the following before the initiation, giving yourself plenty of time so that there is no hurry:
- a chair, facing East if possible
- optional: an altar and incense
- electronics switched off or on silent, so you won’t be disturbed
- your reference card for the initiation sequence
- audio for the meditation, if you are using it
Distance Initiations Only
- a photograph of the student

Ask a question